14、RocketMQ源码分析:BrokerCommitLogDispatcher异步构建ConsumeQueue和IndexFile源码解析 分类:RocketMQ源码分析(1) 2024-03-27 阅读(138)
基于RocketMQ release-4.9.3,深入的介绍了Broker 消息重放服务ReputMessageService中基于 CommitLogDispatcher
**上一章我们学习了ReputMessageService消息重放服务的总体流程:RocketMQ源码(13)—Broker 消息重放服务ReputMessageService源码解析
文章目录
1 CommitLogDispatcherBuildConsumeQueue构建ConsumeQueue
1.1 putMessagePositionInfo写入消息位置信息
1.2 findConsumeQueue查找ConsumeQueue
1.3 putMessagePositionInfoWrapper追加消息索引
2 CommitLogDispatcherBuildIndex构建IndexFile
3 IndexFile小结
1 CommitLogDispatcherBuildConsumeQueue构建ConsumeQueue CommitLogDispatcherBuildConsumeQueue用于接收分发请求并构建ConsumeQueue。
对于非事务消息或者是事务commit消息,则调用DefaultMessageStore#putMessagePositionInfo
1
2
3
4
5
6
7
8
9
10
11
12
13
14
15
16
17
18
19
20
21
22
23
24
25
26
27
28
29
30
class CommitLogDispatcherBuildConsumeQueue implements CommitLogDispatcher { @Override public void dispatch (DispatchRequest request) { final int tranType = MessageSysFlag.getTransactionValue(request.getSysFlag()); switch (tranType) { case MessageSysFlag.TRANSACTION_NOT_TYPE: case MessageSysFlag.TRANSACTION_COMMIT_TYPE: DefaultMessageStore.this .putMessagePositionInfo(request); break ; case MessageSysFlag.TRANSACTION_PREPARED_TYPE: case MessageSysFlag.TRANSACTION_ROLLBACK_TYPE: break ; } } }
1.1 putMessagePositionInfo写入消息位置信息 该方法首先调用findConsumeQueue 方法根据topic和队列id确定需要写入的ConsumeQueue。然后调用*
1 2 3 4 5 6 7 8 9 10 11 12 13 14 15 16 17 18 public void putMessagePositionInfo (DispatchRequest dispatchRequest) { ConsumeQueue cq = this .findConsumeQueue(dispatchRequest.getTopic(), dispatchRequest.getQueueId()); cq.putMessagePositionInfoWrapper(dispatchRequest, checkMultiDispatchQueue(dispatchRequest)); }
1.2 findConsumeQueue查找ConsumeQueue 该方法根据topic和队列id确定需要写入的ConsumeQueue,查找的目标就是consumeQueueTable缓存集合。还可以知道,ConsumeQueue文件是延迟创建的,即当需要到该ConsumeQueue的时候才会新建。
1 2 3 4 5 6 7 8 9 10 11 12 13 14 15 16 17 18 19 20 21 22 23 24 25 26 27 28 29 30 31 32 33 34 35 36 37 38 39 40 41 42 43 44 45 46 47 48 49 50 51 52 53 54 55 56 57 58 59 60 61 public ConsumeQueue findConsumeQueue (String topic, int queueId) { ConcurrentMap<Integer, ConsumeQueue> map = consumeQueueTable.get(topic); if (null == map) { ConcurrentMap<Integer, ConsumeQueue> newMap = new ConcurrentHashMap <Integer, ConsumeQueue>(128 ); ConcurrentMap<Integer, ConsumeQueue> oldMap = consumeQueueTable.putIfAbsent(topic, newMap); if (oldMap != null ) { map = oldMap; } else { map = newMap; } } ConsumeQueue logic = map.get(queueId); if (null == logic) { ConsumeQueue newLogic = new ConsumeQueue ( topic, queueId, StorePathConfigHelper.getStorePathConsumeQueue(this .messageStoreConfig.getStorePathRootDir()), this .getMessageStoreConfig().getMappedFileSizeConsumeQueue(), this ); ConsumeQueue oldLogic = map.putIfAbsent(queueId, newLogic); if (oldLogic != null ) { logic = oldLogic; } else { if (MixAll.isLmq(topic)) { lmqConsumeQueueNum.getAndIncrement(); } logic = newLogic; } } return logic; }
1.2.1 创建ConsumeQueue 创建ConsumeQueue 的构造器方法如下,将会初始化各种属性,然后会初始化20个字节的堆外内存 ,用于临时存储单个索引,这段内存可循环使用。
1
2
3
4
5
6
7
8
9
10
11
12
13
14
15
16
17
18
19
20
21
22
23
24
25
26
27
28
29
30
31
32
33
34
35
36
37
public ConsumeQueue ( final String topic, final int queueId, final String storePath, final int mappedFileSize, final DefaultMessageStore defaultMessageStore) { this .storePath = storePath; this .mappedFileSize = mappedFileSize; this .defaultMessageStore = defaultMessageStore; this .topic = topic; this .queueId = queueId; String queueDir = this .storePath + File.separator + topic + File.separator + queueId; this .mappedFileQueue = new MappedFileQueue (queueDir, mappedFileSize, null ); this .byteBufferIndex = ByteBuffer.allocate(CQ_STORE_UNIT_SIZE); if (defaultMessageStore.getMessageStoreConfig().isEnableConsumeQueueExt()) { this .consumeQueueExt = new ConsumeQueueExt ( topic, queueId, StorePathConfigHelper.getStorePathConsumeQueueExt(defaultMessageStore.getMessageStoreConfig().getStorePathRootDir()), defaultMessageStore.getMessageStoreConfig().getMappedFileSizeConsumeQueueExt(), defaultMessageStore.getMessageStoreConfig().getBitMapLengthConsumeQueueExt() ); } }
*ConsumeQueue文件可以看成是基于topic的commitlog索引文件,故ConsumeQueue文件夹的组织方式如下:topic/queue/file三层组织结构,具体存储路径为:$HOME/store/consumequeue/{topic}/{queueId}/{fileName}。
例如topic名为TopicTest,并且有四个队列,则该topic的ConsumeQueue的组织方式为:
1.3 putMessagePositionInfoWrapper追加消息索引 该方法用于构建消息索引信息并且存入找到的ConsumeQueue文件中。支持重试,最大重试30次。
1 2 3 4 5 6 7 8 9 10 11 12 13 14 15 16 17 18 19 20 21 22 23 24 25 26 27 28 29 30 31 32 33 34 35 36 37 38 39 40 41 42 43 44 45 46 47 48 49 50 51 52 53 54 55 56 57 58 59 60 61 62 63 64 65 66 67 68 69 70 71 72 73 74 75 76 77 78 79 80 81 82 83 84 public void putMessagePositionInfoWrapper (DispatchRequest request, boolean multiQueue) { final int maxRetries = 30 ; boolean canWrite = this .defaultMessageStore.getRunningFlags().isCQWriteable(); for (int i = 0 ; i < maxRetries && canWrite; i++) { long tagsCode = request.getTagsCode(); if (isExtWriteEnable()) { ConsumeQueueExt.CqExtUnit cqExtUnit = new ConsumeQueueExt .CqExtUnit(); cqExtUnit.setFilterBitMap(request.getBitMap()); cqExtUnit.setMsgStoreTime(request.getStoreTimestamp()); cqExtUnit.setTagsCode(request.getTagsCode()); long extAddr = this .consumeQueueExt.put(cqExtUnit); if (isExtAddr(extAddr)) { tagsCode = extAddr; } else { log.warn("Save consume queue extend fail, So just save tagsCode! {}, topic:{}, queueId:{}, offset:{}" , cqExtUnit, topic, queueId, request.getCommitLogOffset()); } } boolean result = this .putMessagePositionInfo(request.getCommitLogOffset(), request.getMsgSize(), tagsCode, request.getConsumeQueueOffset()); if (result) { if (this .defaultMessageStore.getMessageStoreConfig().getBrokerRole() == BrokerRole.SLAVE || this .defaultMessageStore.getMessageStoreConfig().isEnableDLegerCommitLog()) { this .defaultMessageStore.getStoreCheckpoint().setPhysicMsgTimestamp(request.getStoreTimestamp()); } this .defaultMessageStore.getStoreCheckpoint().setLogicsMsgTimestamp(request.getStoreTimestamp()); if (multiQueue) { multiDispatchLmqQueue(request, maxRetries); } return ; } else { log.warn("[BUG]put commit log position info to " + topic + ":" + queueId + " " + request.getCommitLogOffset() + " failed, retry " + i + " times" ); try { Thread.sleep(1000 ); } catch (InterruptedException e) { log.warn("" , e); } } } log.error("[BUG]consume queue can not write, {} {}" , this .topic, this .queueId); this .defaultMessageStore.getRunningFlags().makeLogicsQueueError(); }
1.3.1 putMessagePositionInfo写入消息位置信息 该方法将消息位置信息写入到ConsumeQueue文件中。大概步骤为:
1、 校验如果消息偏移量+消息大小小于等于ConsumeQueue已处理的最大物理偏移量说明该消息已经被写过了,直接返回true;2、 将消息信息offset、size、tagsCode按照顺序存入临时缓冲区byteBufferIndex中;3、 调用getLastMappedFile方法,根据偏移量获取将要写入的最新ConsumeQueue文件的MappedFile,可能会新建ConsumeQueue文件getLastMappedFile方法的源码我们此前学过了;4、 进行一系列校验,例如是否需要重设索引信息,是否存在写入错误等等;5、 更新消息最大物理偏移量maxPhysicOffset=消息在CommitLog中的物理偏移量+消息的大小;
调用MappedFile#appendMessage方法将临时缓冲区中的索引信息追加到mappedFile的mappedByteBuffer中,并且更新wrotePosition的位置信息,到此构建ComsumeQueue完毕。
**从该方法中我们可以知道一条消息在ConsumeQueue中的一个索引条目的存储方式,固定为8B的offset+4B的size+8BtagsCode,固定占用20B。
1、 offset,消息在CommitLog中的物理偏移量 ;2、 size,消息大小 ;3、 tagsCode,延迟消息就是消息投递时间,其他消息就是消息的tags的hashCode ;
1 2 3 4 5 6 7 8 9 10 11 12 13 14 15 16 17 18 19 20 21 22 23 24 25 26 27 28 29 30 31 32 33 34 35 36 37 38 39 40 41 42 43 44 45 46 47 48 49 50 51 52 53 54 55 56 57 58 59 60 61 62 63 64 65 66 67 68 69 70 71 72 73 74 75 76 77 78 79 80 81 82 83 84 85 86 87 88 89 90 91 92 93 94 private boolean putMessagePositionInfo (final long offset, final int size, final long tagsCode, final long cqOffset) { if (offset + size <= this .maxPhysicOffset) { log.warn("Maybe try to build consume queue repeatedly maxPhysicOffset={} phyOffset={}" , maxPhysicOffset, offset); return true ; } this .byteBufferIndex.flip(); this .byteBufferIndex.limit(CQ_STORE_UNIT_SIZE); this .byteBufferIndex.putLong(offset); this .byteBufferIndex.putInt(size); this .byteBufferIndex.putLong(tagsCode); final long expectLogicOffset = cqOffset * CQ_STORE_UNIT_SIZE; MappedFile mappedFile = this .mappedFileQueue.getLastMappedFile(expectLogicOffset); if (mappedFile != null ) { if (mappedFile.isFirstCreateInQueue() && cqOffset != 0 && mappedFile.getWrotePosition() == 0 ) { this .minLogicOffset = expectLogicOffset; this .mappedFileQueue.setFlushedWhere(expectLogicOffset); this .mappedFileQueue.setCommittedWhere(expectLogicOffset); this .fillPreBlank(mappedFile, expectLogicOffset); log.info("fill pre blank space " + mappedFile.getFileName() + " " + expectLogicOffset + " " + mappedFile.getWrotePosition()); } if (cqOffset != 0 ) { long currentLogicOffset = mappedFile.getWrotePosition() + mappedFile.getFileFromOffset(); if (expectLogicOffset < currentLogicOffset) { log.warn("Build consume queue repeatedly, expectLogicOffset: {} currentLogicOffset: {} Topic: {} QID: {} Diff: {}" , expectLogicOffset, currentLogicOffset, this .topic, this .queueId, expectLogicOffset - currentLogicOffset); return true ; } if (expectLogicOffset != currentLogicOffset) { LOG_ERROR.warn( "[BUG]logic queue order maybe wrong, expectLogicOffset: {} currentLogicOffset: {} Topic: {} QID: {} Diff: {}" , expectLogicOffset, currentLogicOffset, this .topic, this .queueId, expectLogicOffset - currentLogicOffset ); } } this .maxPhysicOffset = offset + size; return mappedFile.appendMessage(this .byteBufferIndex.array()); } return false ; }
1.3.1.1 MappedFile#appendMessage追加消息 **该方法用于将数据追加到MappedFile,这里仅仅是追加到对应的mappedByteBuffer中,基于mmap技术仅仅是将数据写入pageCache中,并没有立即刷盘,而是依靠操作系统判断刷盘,这样保证了写入的高性能。
1 2 3 4 5 6 7 8 9 10 11 12 13 14 15 16 17 18 19 20 21 22 23 24 25 26 27 28 29 30 31 32 33 34 35 public boolean appendMessage (final byte [] data) { int currentPos = this .wrotePosition.get(); if ((currentPos + data.length) <= this .fileSize) { try { ByteBuffer buf = this .mappedByteBuffer.slice(); buf.position(currentPos); buf.put(data); } catch (Throwable e) { log.error("Error occurred when append message to mappedFile." , e); } this .wrotePosition.addAndGet(data.length); return true ; } return false ; }
2 CommitLogDispatcherBuildIndex构建IndexFile CommitLogDispatcherBuildIndex用于接收分发请求并构建IndexFile。
首先判断是否支持消息Index,默认是支持的,那么调用IndexService#buildIndex 方法构建。如果不存在则不构建,*因此Index文件是否存在都不影响RocketMQ的正常运行,它进被用来提升根据keys或者时间范围查询消息的效率。 *
1 2 3 4 5 6 7 8 9 10 11 12 13 14 15 16 17 18 @Override public void dispatch (DispatchRequest request) { if (DefaultMessageStore.this .messageStoreConfig.isMessageIndexEnable()) { DefaultMessageStore.this .indexService.buildIndex(request); } }
2.1 buildIndex构建Index索引 该方法用于为一条消息构建Index索引,大概步骤为:
1、 通过retryGetAndCreateIndexFile 方法获取或创建最新索引文件IndexFile,支持重试最多3次 ;2、 判断当前消息在commitlog中的偏移量小于该文件的结束索引在commitlog中的偏移量,那么表示已为该消息构建Index索引,直接返回如果该消息是事务回滚消息,则同样直接返回,不需要创建索引;3、 获取客户端生成的uniqId ,也被称为msgId,从逻辑上代表客户端生成的唯一一条消息,如果uniqId不为null,那么调用putKey方法为uniqId构建索引;4、 获取客户端传递的keys,如果keys不为空,那么调用putKey方法为keys中的每一个key构建索引;
1 2 3 4 5 6 7 8 9 10 11 12 13 14 15 16 17 18 19 20 21 22 23 24 25 26 27 28 29 30 31 32 33 34 35 36 37 38 39 40 41 42 43 44 45 46 47 48 49 50 51 52 53 54 55 56 57 58 59 60 61 62 63 64 65 66 67 68 69 70 71 72 73 74 75 76 77 78 79 80 81 82 83 84 85 public void buildIndex (DispatchRequest req) { IndexFile indexFile = retryGetAndCreateIndexFile(); if (indexFile != null ) { long endPhyOffset = indexFile.getEndPhyOffset(); DispatchRequest msg = req; String topic = msg.getTopic(); String keys = msg.getKeys(); if (msg.getCommitLogOffset() < endPhyOffset) { return ; } final int tranType = MessageSysFlag.getTransactionValue(msg.getSysFlag()); switch (tranType) { case MessageSysFlag.TRANSACTION_NOT_TYPE: case MessageSysFlag.TRANSACTION_PREPARED_TYPE: case MessageSysFlag.TRANSACTION_COMMIT_TYPE: break ; case MessageSysFlag.TRANSACTION_ROLLBACK_TYPE: return ; } if (req.getUniqKey() != null ) { indexFile = putKey(indexFile, msg, buildKey(topic, req.getUniqKey())); if (indexFile == null ) { log.error("putKey error commitlog {} uniqkey {}" , req.getCommitLogOffset(), req.getUniqKey()); return ; } } if (keys != null && keys.length() > 0 ) { String[] keyset = keys.split(MessageConst.KEY_SEPARATOR); for (int i = 0 ; i < keyset.length; i++) { String key = keyset[i]; if (key.length() > 0 ) { indexFile = putKey(indexFile, msg, buildKey(topic, key)); if (indexFile == null ) { log.error("putKey error commitlog {} uniqkey {}" , req.getCommitLogOffset(), req.getUniqKey()); return ; } } } } } else { log.error("build index error, stop building index" ); } }
2.1.1 retryGetAndCreateIndexFile获取IndexFile **该方法用于获取或创建索引文件,支持重试。方法中开启了一个循环,最多循环三次,在循环中调用getAndCreateLastIndexFile方法获取最新的索引文件,如果文件写满了或者还没有文件则会自动创建新的索引文件。
1 2 3 4 5 6 7 8 9 10 11 12 13 14 15 16 17 18 19 20 21 22 23 24 25 26 27 28 29 30 31 32 33 34 35 36 37 38 39 40 public IndexFile retryGetAndCreateIndexFile () { IndexFile indexFile = null ; for (int times = 0 ; null == indexFile && times < MAX_TRY_IDX_CREATE; times++) { indexFile = this .getAndCreateLastIndexFile(); if (null != indexFile) break ; try { log.info("Tried to create index file " + times + " times" ); Thread.sleep(1000 ); } catch (InterruptedException e) { log.error("Interrupted" , e); } } if (null == indexFile) { this .defaultMessageStore.getAccessRights().makeIndexFileError(); log.error("Mark index file cannot build flag" ); } return indexFile; }
2.1.1.1 getAndCreateLastIndexFile获取最新IndexFile 该方法尝试获取最新的索引文件,如果文件写满了或者还没有文件则会自动创建新的索引文件。大概步骤为:
1、 首先获取读锁;
1、 如果indexFileList不为空,那么尝试获取最后一个IndexFile,否则创建一个新的,比如第一次写;2、 如果最后一个IndexFile没写满,则赋值给indexFile,后面直接返回;3、 如果最后一个IndexFile写满了,则创建新文件,获取目前最后一个文件的endPhyOffset,获取目前最后一个文件的endTimestamp等信息;4、 释放读锁;2、 如果上一步没有获取到indexFile,那么尝试创建一个新的IndexFile;
1、 获取完整文件名$HOME/store/index${fileName},fileName是以创建时的时间戳命名的,精确到毫秒,例如20220512214613292;2、 调用IndexFile的构造器创建新的IndexFile;3、 获取写锁将新建的IndexFile加入到indexFileList集合尾部释放写锁;
创建了新的文件之后,那么尝试将上一个文件刷盘。新开一个线程,异步的调用IndexService#flush方法对上一个IndexFile文件刷盘。
3、 最后返回获取的indexFile;
*可以看到,这里尝试获取的是最新的IndexService,并且引入了读写锁的设计。在获取indexFileList的最后一个元素时使用读锁,而在创建了indexFile之后向indexFileList添加indexFile的时候使用写锁。使用读写锁的好处很明显,既保证了数据安全,同时保证了效率的最大化,因为Index文件的使用永远都是查询远远大于创建的。
1 2 3 4 5 6 7 8 9 10 11 12 13 14 15 16 17 18 19 20 21 22 23 24 25 26 27 28 29 30 31 32 33 34 35 36 37 38 39 40 41 42 43 44 45 46 47 48 49 50 51 52 53 54 55 56 57 58 59 60 61 62 63 64 65 66 67 68 69 70 71 72 73 74 75 76 77 78 79 80 81 82 83 84 85 86 87 88 89 90 91 92 93 94 95 96 97 98 99 100 101 102 103 104 105 106 public IndexFile getAndCreateLastIndexFile () { IndexFile indexFile = null ; IndexFile prevIndexFile = null ; long lastUpdateEndPhyOffset = 0 ; long lastUpdateIndexTimestamp = 0 ; { this .readWriteLock.readLock().lock(); if (!this .indexFileList.isEmpty()) { IndexFile tmp = this .indexFileList.get(this .indexFileList.size() - 1 ); if (!tmp.isWriteFull()) { indexFile = tmp; } else { lastUpdateEndPhyOffset = tmp.getEndPhyOffset(); lastUpdateIndexTimestamp = tmp.getEndTimestamp(); prevIndexFile = tmp; } } this .readWriteLock.readLock().unlock(); } if (indexFile == null ) { try { String fileName = this .storePath + File.separator + UtilAll.timeMillisToHumanString(System.currentTimeMillis()); indexFile = new IndexFile (fileName, this .hashSlotNum, this .indexNum, lastUpdateEndPhyOffset, lastUpdateIndexTimestamp); this .readWriteLock.writeLock().lock(); this .indexFileList.add(indexFile); } catch (Exception e) { log.error("getLastIndexFile exception " , e); } finally { this .readWriteLock.writeLock().unlock(); } if (indexFile != null ) { final IndexFile flushThisFile = prevIndexFile; Thread flushThread = new Thread (new Runnable () { @Override public void run () { IndexService.this .flush(flushThisFile); } }, "FlushIndexFileThread" ); flushThread.setDaemon(true ); flushThread.start(); } } return indexFile; }
1.1.1.2 创建IndexFile 当第一次构建Index或者之前的IndexFile写满了的时候,需要通过IndexFile的构造器创建新的IndexFile。
Index文件的存储位置是:$HOME/store/index${fileName},文件名fileName是以创建时的时间戳命名的,固定的单个IndexFile文件大小约为:40B
1 2 3 4 5 6 7 8 9 10 11 12 13 14 15 16 17 18 19 20 21 22 23 24 25 26 27 28 29 30 31 32 33 34 35 36 37 38 39 40 41 42 43 public IndexFile (final String fileName, final int hashSlotNum, final int indexNum, final long endPhyOffset, final long endTimestamp) throws IOException { int fileTotalSize = IndexHeader.INDEX_HEADER_SIZE + (hashSlotNum * hashSlotSize) + (indexNum * indexSize); this .mappedFile = new MappedFile (fileName, fileTotalSize); this .fileChannel = this .mappedFile.getFileChannel(); this .mappedByteBuffer = this .mappedFile.getMappedByteBuffer(); this .hashSlotNum = hashSlotNum; this .indexNum = indexNum; ByteBuffer byteBuffer = this .mappedByteBuffer.slice(); this .indexHeader = new IndexHeader (byteBuffer); if (endPhyOffset > 0 ) { this .indexHeader.setBeginPhyOffset(endPhyOffset); this .indexHeader.setEndPhyOffset(endPhyOffset); } if (endTimestamp > 0 ) { this .indexHeader.setBeginTimestamp(endTimestamp); this .indexHeader.setEndTimestamp(endTimestamp); } }
2.1.2 buildKey构建Key **该方法构建Index索引的key。RocketMQ将会为uniqId和keys中的每个key构建索引,但是并不是直接以这两个参数作为key的,而是通过buildKey方法进行了处理。
UniqKey将会转换为topic#UniqKey,而keys则会先通过空格拆分,然后将每个key转换为topic#key,然后才会构建索引。
也就是说,IndexFile支持通过Topic以及UNIQ_KEY或者KEYS来查询消息。
1 2 3 4 5 6 7 8 9 10 private String buildKey (final String topic, final String key) { return topic + "#" + key; }
2.1.3 putKey构建Index索引 我们开头就说过Index文件主要用于加快查询的操作,更详细的内容见:RocketMQ的消息查询(查询消息) 。
**IndexFile文件的存储位置是:$HOME\store\index${fileName},文件名fileName是以创建时的时间戳命名的,文件大小是固定的,等于40+500W*4+2000W*20=
putKey方法就是构建Index索引的入口方法,该方法将会循环调用indexFile#putKey方法构建Index索引,知道成功,而每次构建失败都将调用retryGetAndCreateIndexFile方法尝试获取或创建最新索引文件然后再尝试构建。
1 2 3 4 5 6 7 8 9 10 11 12 13 14 15 16 17 18 19 20 21 22 23 24 25 26 27 28 29 30 private IndexFile putKey (IndexFile indexFile, DispatchRequest msg, String idxKey) { for (boolean ok = indexFile.putKey(idxKey, msg.getCommitLogOffset(), msg.getStoreTimestamp()); !ok; ) { log.warn("Index file [" + indexFile.getFileName() + "] is full, trying to create another one" ); indexFile = retryGetAndCreateIndexFile(); if (null == indexFile) { return null ; } ok = indexFile.putKey(idxKey, msg.getCommitLogOffset(), msg.getStoreTimestamp()); } return indexFile; }
2.1.3.1 IndexFile#putKey构建Index索引 该方法用于构建Index索引,大概步骤为:
1、 判断如果当前文件的index索引数量小于2000w ,则表明当前文件还可以继续构建索引,;2、 计算Key的哈希值keyHash 3、 计算当前消息在commitlog中的消息存储时间与该Index文件起始时间差timeDiff 计算该消息的索引存放位置的绝对偏移量*4、 在absIndexPos位置顺序存放Index索引数据,共计20B 5、 在absSlotPos位置更新当前hash槽的值为最新的IndexFile的索引条目计数的编号 6、 判断如果索引数量小于等于1,说明时该文件第一次存入索引,那么初始化beginPhyOffset和beginTimestamp;7、 继续判断如果slotValue为0,那么表示采用了一个新的哈希槽,此时hashSlotCount自增1;8、 因为存入了新的索引,那么索引条目计数indexCount自增1,设置新的endPhyOffset和endTimestamp;
1 2 3 4 5 6 7 8 9 10 11 12 13 14 15 16 17 18 19 20 21 22 23 24 25 26 27 28 29 30 31 32 33 34 35 36 37 38 39 40 41 42 43 44 45 46 47 48 49 50 51 52 53 54 55 56 57 58 59 60 61 62 63 64 65 66 67 68 69 70 71 72 73 74 75 76 77 78 79 80 81 82 83 84 85 86 87 88 89 90 91 92 93 94 95 96 97 98 99 100 101 102 103 104 105 106 107 108 109 110 111 112 113 114 115 116 117 118 119 120 121 122 123 124 125 126 127 128 public boolean putKey (final String key, final long phyOffset, final long storeTimestamp) { if (this .indexHeader.getIndexCount() < this .indexNum) { int keyHash = indexKeyHashMethod(key); int slotPos = keyHash % this .hashSlotNum; int absSlotPos = IndexHeader.INDEX_HEADER_SIZE + slotPos * hashSlotSize; FileLock fileLock = null ; try { int slotValue = this .mappedByteBuffer.getInt(absSlotPos); if (slotValue <= invalidIndex || slotValue > this .indexHeader.getIndexCount()) { slotValue = invalidIndex; } long timeDiff = storeTimestamp - this .indexHeader.getBeginTimestamp(); timeDiff = timeDiff / 1000 ; if (this .indexHeader.getBeginTimestamp() <= 0 ) { timeDiff = 0 ; } else if (timeDiff > Integer.MAX_VALUE) { timeDiff = Integer.MAX_VALUE; } else if (timeDiff < 0 ) { timeDiff = 0 ; } int absIndexPos = IndexHeader.INDEX_HEADER_SIZE + this .hashSlotNum * hashSlotSize + this .indexHeader.getIndexCount() * indexSize; this .mappedByteBuffer.putInt(absIndexPos, keyHash); this .mappedByteBuffer.putLong(absIndexPos + 4 , phyOffset); this .mappedByteBuffer.putInt(absIndexPos + 4 + 8 , (int ) timeDiff); this .mappedByteBuffer.putInt(absIndexPos + 4 + 8 + 4 , slotValue); this .mappedByteBuffer.putInt(absSlotPos, this .indexHeader.getIndexCount()); if (this .indexHeader.getIndexCount() <= 1 ) { this .indexHeader.setBeginPhyOffset(phyOffset); this .indexHeader.setBeginTimestamp(storeTimestamp); } if (invalidIndex == slotValue) { this .indexHeader.incHashSlotCount(); } this .indexHeader.incIndexCount(); this .indexHeader.setEndPhyOffset(phyOffset); this .indexHeader.setEndTimestamp(storeTimestamp); return true ; } catch (Exception e) { log.error("putKey exception, Key: " + key + " KeyHashCode: " + key.hashCode(), e); } finally { if (fileLock != null ) { try { fileLock.release(); } catch (IOException e) { log.error("Failed to release the lock" , e); } } } } else { log.warn("Over index file capacity: index count = " + this .indexHeader.getIndexCount() + "; index max num = " + this .indexNum); } return false ; }
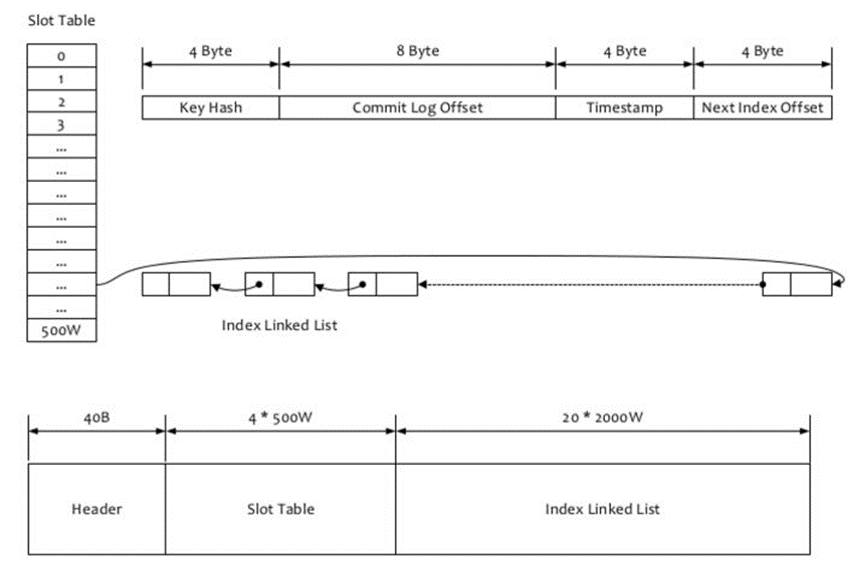
3 IndexFile小结 学习了上面的源码,我们总结一下。RocketMQ的消息查询(查询消息) 。IndexFile的构成包括40B的Header头信息,4*500wB的Slot信息,20*2000wB的Index信息,具体解释为:
1、 文件前40个字节存放头信息 ,在Java中被表示为IndexHeader,存放着一些统计信息,按顺序包括:;
1、 8B的beginTimestamp ,该索引文件存储的第一条索引对应的消息在commitlog中的消息存储时间;2、 8B的endTimestamp ,该索引文件存储的最后一条索引对应的消息在commitlog中的消息存储时间;3、 8B的beginPhyOffset ,该索引文件存储的第一条索引对应的消息在commitlog中的物理偏移量;4、 8B的endPhyOffset ,该索引文件存储的最后一条索引对应的消息在commitlog中的物理偏移量;5、 4B的hashSlotCount ,哈希槽计数;6、 4B的indexCount ,索引条目计数+1;2、 文件第二部分存储4*500wB的HashSlot信息 3、 文件第三部分存储20*2000wB的Index信息 ,这才是真正的索引信息,按顺序包括:;
1、 4B的KeyHash ,当前消息的Key的哈希值;2、 8B的CommitLogOffset ,当前消息在commitlog中的物理偏移量;3、 4B的Timestamp ,当前消息在commitlog中的消息存储时间与该Index文件起始时间差;4、 4B的NextIndexoffset ,即前面读出来的slotValue,可能是0,也可能不是0,而是上一个发生hash冲突的索引条目的编号,或者说链表的下一个索引的Index位置;
上面描述的是Index索引的物理存储结构,注意一个消息的slot位置是根据哈希值计算出来的,而具体的索引条目是按照顺序存储的。
我们之前说过Index索引在逻辑上是一个哈希表的实现,采用链表来解决hash冲突,这里该怎么理解呢?
假设一个消息A ,根据hash值计算出的slot位置为240 ,这个位置是一个新位置 ,此前没有被使用过。那么其值默认为0,假设此时的indexCount 为100,那么存储的新索引条目的最后NextIndex offset =0,随后将该位置的slot置为indexCount,即100。
后来一个新的消息B ,根据hash值计算出的slot位置也是240 ,这个位置已被使用过 。那么其值为100,实际上就是上一个索引存放的Index偏移量,假设此时的indexCount 为200,那么存储的新索引条目的最后NextIndex offset =100,随后将该位置的slot置为indexCount,即200。
**可以发现,slot的值永远保存着具有该hash值的最新索引条目的偏移量信息,而索引条目的NextIndex
__END__